 Superior Courts Act, 2013
R 385
Mine Health and Safety Act, 1996 (Act No. 29 of 1996)RegulationsGuideline for a Mandatory Code of PracticeOccupational Health Programme (Occupational Hygiene and Medical Surveillance) on Personal Exposure to Airborne PollutantsAnnexuresAnnexure E : Background information, sampling and analysis on particulates6. Sampling methodology |
| 6.1 | Introduction |
As small quantities of particulates are collected in personal gravimetric sampling, the most practical method of assessing such quantities of particulates is to establish the mass of the clean filter before sampling, and then to observe the increase in filter mass due to the particulates collected on the filter. In principle, the difference between the "before sampling" mass and the "after sampling" mass represents the mass of particulates collected.
There are, however, factors which could affect the particulate mass measurement. These include:
| (i) | Variation in filter mass due to absorption or desorption of moisture between the "before"- and "after' sampling mass determinations. |
| (ii) | The basic limitations of instrumentation, weighing procedure and competency of staff. |
This standard weighing procedure incorporates practical means for alleviating these problems.
| 6.2 | Requirements of sampling pump |
A portable battery powered pump must be used for personal sampling. The capacity of the battery must be sufficient to operate continuously over the chosen sampling time. The pump should be capable of maintaining the required flow rate with a variation within ±5% for the entire sampling duration, allowing for increasing filter loads. Pumps with automatic flow control facilities are recommended. The performance characteristics of field sampling pumps vary considerably and reference should be made to experienced laboratories for selection of pumps for specific sampling applications.
The flow must be sufficiently free from pulsation. As a minimum and tentative criterion, there must be no visible vibration of a rotameter float, if such a flow meter is connected to the filter holder with the filter inserted. It may be necessary to install a pulsation damper between the pump and the filter if an internal pulsation damper has not been included or if the pump shows significant pulsation.
Connecting tubing must be constriction-proof and the connections leak proof.
| CAUTION: | When sampling in explosive gas or dust atmospheres, ensure that the sampling pump is intrinsically safe. |
| 6.3 | Calibrating a pump with an electronic calibrator |
Personal sampling pumps are essential tools for sampling airborne contaminants. However, the determination of airborne concentrations requires accurate knowledge of the volume of air sampled. This value depends upon the constancy of the flow rate of the pump, and upon the reliability of the means of measuring that rate.
Built-in rotameters on sample pumps are not precision instruments and cannot be used to determine a pump's flow rate. These devices provide only an approximation.
Flow rates should be measured with an instrument such as an electronic calibrator, which bases measurement on the unchanging physical dimensions of an enclosed volume. A precision rotameter can also be used, but only if its calibration is traceable to a device such as an electronic calibrator or a film flow meter, and the rotameter is capable of maintaining accuracy with reasonable care and handling. Unlike an electronic calibrator, a precision rotameter requires periodic calibration.
Equipment required
| • | An air-sampling pump capable of sampling at the recommended flow rate with the sampling medium in line; |
| • | An electronic calibrator (or precision rotameter); |
| • | The sampling media as specified in the method; and |
| • | Any additional equipment specified in the method. |
| (a) | Setting up the electronic calibrator |
Pour a small amount of film solution into the bottom opening of the flow cell.
The amount of solution is not critical, but the solution level should just cover the bottom of the flow cell. A large amount of soap may cause a stream of bubbles at high flows.
| (b) | Setting up the sampling train |
Prepare an appropriate sampling train as specified in the method. Ensure that the pump is in the appropriate mode (high- or low-flow) for the desired flow rate, and that any necessary flow accessories (such as pressure controllers) are in place. With flexible tubing, connect the outlet of the sampling media (filter cassette, sorbent tube, impinger, etc.) to the inlet of the pump.
| (c) | Calibrating the flow rate |
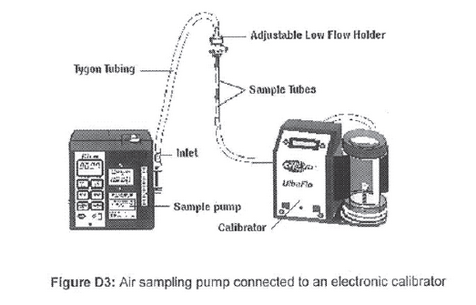
Turn on the pump and allow approximately five minutes for stabilisation. Connect the inlet of the sampling media to the electronic calibrator (see Figure D3). Make this connection with the shortest tubing length possible and avoid kinks and bends in the tubing for accurate measurements.
NOTE: Some electronic calibrators have two fittings: one for negative pressure and one for positive pressure. Please refer to your calibrator operating instructions for the proper fitting selection.
Prepare the calibrator for use by ensuring that the flow cell is completely wet with bubble solution. To wet the flow cell, start the soap film travelling up the flow cell by repeatedly pressing and releasing the plunger button or squeezing the rubber bulb. Continue to generate bubbles until the bubbles travel the entire length of the tube without breaking and the flow cell is completely wet with bubble solution.
To calibrate the flow rate, start a single bubble travelling up the flow cell by pressing the button or squeezing the bulb. Observe the bubble passing through the tube, The bubble must travel the entire length of the tube for an accurate measurement. A flow rate is displayed on the calibrator LCD. Perform a minimum of three readings to accurately determine the flow rate.
Several readings and adjustments may be needed until the desired flow rate achieved.
(d) Sampling
When ready to begin sampling, set up a calibrated sampling train. Use preprepared sampling media of the same type. Attach the sampling media to the worker's clothing within the breathing zone and the pump to the worker's belt. Activate the pump and note the start time.
(e) After sampling
At the end of the sampling period, turn the pump off and note the stop time. Using the calibrator, measure the flow rate following the directions outlined earlier. Record this value as the "post-sample" flow rate. Compare the pre-sample and post-sample flow rates to ensure that the two flow rates do not differ by more than 5%. The average of the pre-sample and post-sample flow rates should be reported to the weighing facility along with other relevant data including the sample time. Remove the sampling media, seal the sampling media for transport to the weighing facility and record pertinent sampling information,
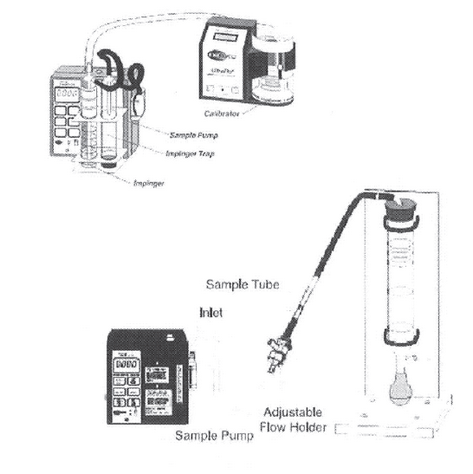
| 6.4 | Calibrating a pump with a film flowmeter |
| 6.4.1 | Equipment required |
| • | Air sampling pump capable of sampling at the recommended flow rate with the sampling medium in line; |
| • | Film flow meter - air flow calibrator or precision rotameter; |
| • | Precision timing device; |
| • | The sampling media as specified in the method; and |
| • | Any additional equipment specified in the method. |
| 6.4.2 | Introduction |
To determine the correct flow rate for the chemical being sampled, refer to the appropriate analytical method. Please refer to the operating instructions for the pump to ensure that it is capable of sampling at the correct flow rate.
| (a) | Setting up the film flow meter |
Some film flow meters come with a separate stand or base. If so, stand the glass tube vertically using the base so that the rubber squeeze bulb is at the bottom. If no base is provided, use lab clamps and a support stand. Remove the rubber cap from the lower side arm of the glass tube. Pour film solution into the lower side arm so that the solution enters the rubber bulb and the level of the solution is about 1/1 inch (6-7 mm) above the upper rim of the bulb. The solution level should not reach the side arm of the tube. A pipette may facilitate the filling procedure. Alternatively, film solution can be introduced through the top of the glass tube. Simply remove the stopper, tilt the tube and pour gently. When operating the flow meter, the cap must remain off the side arm.
| (b) | Setting up the sampling train |
Prepare an appropriate sampling train as specified in the method. Ensure that the pump is in the appropriate mode (high- or low-flow) for the desired flow rate, and that any necessary flow accessories are in place. With flexible tubing, connect the outlet of the sampling media (filter cassette, sorbent tube, impinger, etc.) to the inlet of the pump. Connect the inlet of the sampling media to the outlet (upper port) of the film flow meter.
| (c) | Calibrating the flow rate |
Remove the rubber cap from the lower side arm of the flow meter. Turn on the pump. While the pump is operating, repeatedly squeeze the rubber bulb at the base of the glass flow meter tube until a flat soap bubble (film) enters the tube and rises up the column. Introduce several bubbles into the tube to wet the tube interior so that the soap film successfully travels the entire length of the tube. Observe the soap film as it passes the volume lines marked on the glass tube. Using a stopwatch or other precision timing device, accurately determine the time it takes for a single soap film to travel from one volume line to another. This time, together with the volume delineated on the tube, represents the flow rate:
Flow rate = volume bubble travels (ml or L) / time it took to travel (min)
Using the flow adjust control on the pump, increase or decrease the flaw rate until it approximates the intended flow rate as specified in the sampling method. Several measurements and adjustments may be needed until the desired flow rate is achieved.
| (d) | Determining the flow rate |
Once the desired flow rate has been achieved, accurately measure the flow rate at least three times using the flowmeter in the manner described above.
(Do not adjust the pump's flow adjust control this time.) Average the results.
Record this averaged value as the "pre-sample" flow rate
| (e) | Sampling |
When ready to start sampling, set up a new sampling train identical to the one used to measure and calibrate the flow. Use new sampling media of the same type. Do not discard the sampling devices that were used to calibrate the flow; these will be used to check the flow again when sampling is completed. Attach the sampling media to the worker's collar and the pump to the worker's belt, Activate the pump and note the start time.
| (f) | After sampling |
At the end of the sampling period, turn the pump off and note the stop time. Remove the sampling media, seal the ends and record pertinent sampling information.
| (g) | Rechecking the flow |
Reattach the sampling media originally used to calibrate the flow rate of the pump (if these are not available, use new media). Using the flow meter, measure the flow rate following the directions outlined in step 4. Record this averaged value as the "post-sample" flow rate. Compare the pre- and postsample flow rates to ensure that the two flow rates do not differ by more than 5%, The average of the pre- and post-sample flow rates will be reported to the weighing facility along with other relevant data.